Quantcast
Channel: remote control – Hackaday
Viewing all 175 articles
Browse latest View live

ShuttAVR can snap a pic or serve as an intervalometer

$
0
0

shuttAVR-intervalometer-hack

This project started as a simple microcontroller replacement on this IR camera remote control PCB. But the soldering job went rather badly for [Balthamos] so he changed things up and designed his own simple AVR remote shutter release and intervalometer.

The DIP chip seen with most of its legs bent backwards is the ATtiny25 which makes the system work. It’s patched into the traces for the battery connections, button (on the other side of the board) and the IR LED he’s pinching with his left hand. Point it at a Cannon camera and push the button to snap a photo. But as you can see in the clip after the break it also serves as an intervalometer; letting him take several pictures with a user-defined pause between each. That mode is selected by first pressing and holding the button. Once released the chip waits for a second button press to register the delay. The new circuit still fits in the original case after just a bit of alteration to it.


Filed under: ATtiny hacks, digital cameras hacks

Adding fireplace control to your home automation

$
0
0

fireplace-automation

[James] has an admirable home automation system which he’s been working on for years. It does things like monitor the state of the garage door, control the lights, and it even notifies him of a power failure. One thing that wasn’t on the system yet are the fireplaces he has in his home. The hardware you see above is how he patched into the fireplace remote control system in order to automate them.

The remote control uses RF to communicate with a base station. Unlike controlling home theater components which use IR, this makes it a bit more difficult to patch into. Sure, we’d love to see some reverse engineering of the protocol so that a simple radio module could be used, but [James] chose the route which would mean the least amount of hacking on his part. He soldered wires onto the PCB for the buttons and connected to them using reed relays. These let the Arduino simulate button presses.

With the rig connected to the home network he has a lot of options. The system can sense if the house is occupied. If it determines that no one is home it will switch off the fireplaces. [James] also mentions the ability to monitor for carbon monoxide or house fires, switching off the gas fireplaces in either case.


Filed under: home hacks

Remote control command center includes RF and IR functions

$
0
0

all-in-one-remote-relay-includes-RF

We’re still not quite sure what to call these projects, but as we’ve said before, it’s a pleasure to see what people are doing to use one remote control to rule them all. The project being developed by [Kalle Löfgren] seeks to simplify the remote controlled items in his home by combining all control into one smart phone app. The linchpin of the system is this command center which lets a smart phone send IR and RF commands to various devices (translated).

We’ve seen this done with pretty beefy microcontrollers, like this project that uses a PIC32. But the communications going on between the smartphone and the base station are very simple, as are the remote control commands which are being relayed. So we’re not surprised to find that this setup just uses an ATmega88, IR LED, Bluetooth Module, and RF module. There is no connection to a computer (the USB simply provides power via a cellphone charger). If you’re interested in how [Kalle] sniffed the protocol for each remote he wrote two other articles which you can find in the write-up linked above.


Filed under: home entertainment hacks, home hacks

Chromebook hack controls your television

$
0
0

chromebook_remote_control1

[Michael Kohn] only accomplished about half of what he set out to, but we still think his TV channel switcher from a Chromebook turned out nicely. When starting the project he wanted to include a grid of listing so that he could choose a specific program, but decided that scraping the data was too much work for this go-round.

The Chromebook doesn’t include an IR transmitter so he built one using an MSP430 chip. He had previously built a little transmitter around an AVR chip and was surprised to find that the internal oscillator on that was quite a bit more accurate than on the MSP430. Timing is everything with the Manchester encoded signals used for IR remote controls so he used his oscilloscope to tune the DCO as accurately as possible.

The app shown on the screen was written in Javascript. Google published some example code on using RS232 with the computer; [Michael] used this resource to provide communications between the computer and the microcontroller.


Filed under: computer hacks, home entertainment hacks

Giving an RC tank a fire control computer

$
0
0

tank

[Vincent] plays around with remote control tanks, and even though his current model is a WWII-era armor piece, he’d still like modern accoutrements such as a fire control computer and laser sighting for his main gun. His latest project did just that (French, Google translation) with the help of an Arduino, a few modifications to the receiver, and an IR rangefinder.

The stock RC tank includes servos to move the turret and the requisite electronics to fire an Airsoft gun. The precision of the mechanical movements inside the turret weren’t very precise, though, so [Vincent] had to gear down the servos to turn large movements into slight adjustments. After that, he installed an IR rangefinder and laser diode onto the barrel that allowed the gun to sight a target and read its distance.

After some experimentation with the rangefinder and laser, [Vincent] plotted data from firing a few BBs at a whole bunch of distances and targets. The graph came out fairly linear, and after plugging this into a graphing calculator, he was able to find an equation that took into account the distance and angle so the Arduino-powered fire control computer would hit its mark.

The accuracy of the gun is very impressive, all things considered. [Vincent] is able to accurately fire BBs downrange and hit an 8×12 cm target at five meters. You can check out that action below.


Filed under: Arduino Hacks, toy hacks

Robot theater isn’t so much for the actors as the stagehands

$
0
0

robot-theater

[Chris Rybitski] developed this low-profile robot to help move scenery on stage. The test footage shows it to be spry and able to move hundreds of pounds of cargo. The demo shows the addition of a wooden platform about twice the length of the metal chassis with casters at each end to support the extra weight. It seems to have no problem moving around with the weight of a couple of human passengers on board.

Crafty systems for changing huge sets has long made the theater a natural breeding ground for hacks. Balanced turn tables, rails systems, and the like are common place. But we think this has a ton of potential. Right now the electronics seem convoluted, as there is an Arduino running the motors which connects to the LAN using an Ethernet shield and that Linksys wireless router.

We think he should patch directly into the serial port of the router. If he loads DD-WRT or OpenWRT he can easily make the remote control a web interface. We also wonder about the possibility of making it a line-follower that can precisely position itself automatically using patterns on the floor.


Filed under: Arduino Hacks, robots hacks

A real car remote controlled with an Arduino… what could go wrong?

$
0
0

[Gilad] tipped us about his latest project, where he adds plenty of pneumatics and electronics into his wife’s car to remote control it.

The brake/throttle pedals are actuated by pistons controlled by electronic valves, and a standard DC motor is in charge of turning the wheel. The Arduino code tells us that the valves will be opened as long as the remote up/down channel is above/under given values. The frame is based on Festo aluminium profiles and we’re not sure where the mains used for the DC/DC converters is coming from.  As the valves use 24V and the motor 12V, standard N-Mosfets and power relays are used for voltage conversion. The remote controller [Gilard] used is actually 20 years old, so the output signal of the receiver isn’t actually really clean.

We do hope to never see this car on the road….


Filed under: hardware, transportation hacks

Screaming fast RC Hovercraft

$
0
0

diyrchovercraft

Of all the homemade RC Hovercraft floating around out there, this build is not only one of the better looking: it’s also unexpectedly quick. [ScratchBuiltAircraft] sourced foam board from the local dollar store to construct the hovercraft’s body and a heavy-duty garbage bag with a hole cut in the center for the skirt. Air reaches the skirt area from the hovercraft’s EDF (Electric Duct Fan — the big one on the back) which pumps the air through a rectangular hole in the base.

A servo mounted behind the fan controls the rudders, while the rest of the electronics and the battery are cleanly tucked away beneath foam body pieces. We’re not sure what kind of top speed the Turnigy motor provides, but it’s probably impressive assuming it can keep from flipping over. Watch it blast off with a bit too much lift in the video below.

For something a bit slower, there’s always the solar powered hovercraft from earlier this summer.

[via Hacked Gadgets]


Filed under: toy hacks

Cloning an infrared disarming remote of a $8 home security system

$
0
0

5

[Sylvio] decided to buy one of the cheap alarm systems you can find on the internet to have a look at its insides. The kit he bought was composed of one main motion sensor and two remote controls to arm/disarm it.

Communication between the remotes and the sensor is done by using infrared, requiring a direct line of sight for a signal to be received. Modern alarm systems typically use RF remotes with a typical frequency of 434MHz or 868MHz.  In his write-up, [Sylvio] first tries to replicate the IR signal with one of his ‘learning remote controls’ without success and then proceed to reverse engineering the remote circuit shown in the above picture. Hackaday readers may figure out just by looking at it that it is a simple astable multivibrator (read ‘oscillator’). Its main frequency is 38.5kHz, which is typical for IR applications. Therefore, if one of your neighbours had this ‘security system’ one could just disarm it with any of the same remotes…

[Sylvio] then explains different ways to replicate the simple IR signal, first with an Arduino then with a frequency generator and finally using the USB Infrared Toy from Dangerous Prototypes. We agree with his conclusion: “you get what you pay for”.


Filed under: hardware, security hacks

Learn to Translate IR Codes and Retransmit Using Arduino

$
0
0

EEVBlog IR transmitter

[Dave Jones] from EEVBlog.com takes “Arduino fan boys” off the garden path getting down and dirty with different methods to capture, evaluate and retransmit IR remote control codes. Capturing and reproducing IR remote control codes is nothing new, however, [Dave] carves his own roads and steers us around some “traps for young players” along the way.

[Dave] needed a countdown timer that could remotely start and stop recording on his Cannon video camera, which he did with simplicity in a previous EEVBlog post using a commercial learning remote control unit. The fans demanded better so he delivered with this excellent tutorial capturing IR codes on his oscilloscope from an IR decoder (yellow trace) as well as using an IR photo transistor (blue trace) which showed the code inclusive of 38 KHz carrier frequency. Either capture method could easily be used to examine the transmitted code. The second lesson learned from the captured waveforms was the type of code modulation being used. [Dave’s] remote transmitted NEC (Japanese) pulse length encoding — which can be assertaind by referencing the Infrared Remote Control Techniques (PDF). Knowing the encoding methodology it was trivial to manually translate the bits for later use in an Arduino transmitter sketch. We find it amazing how simple [Dave] makes the process seem, even choosing to write his own sketch to reproduce and transmit the IR codes and carrier instead of taking the easy road looking for existing libraries.

A real gem of knowledge in the video was when it didn’t work! We get to follow along as [Dave] stumbles before using a Saleae Logic analyzer to see that his transmitter was off frequency even though the math in his sketch seemed correct. Realizing the digital write routine was causing a slowdown he fudged his math to make the needed frequency correction. Sure, he could have removed the performance glitch by writing some custom port control but logic dictates using the fastest and simplest solution when hacking a one-off solution.

[Dave’s] video and links to source code after the break.

Dave’s Arduino sketch


Filed under: home entertainment hacks, wireless hacks

Game controller repurposed for flea market find

$
0
0

powerPannerControlReplacement

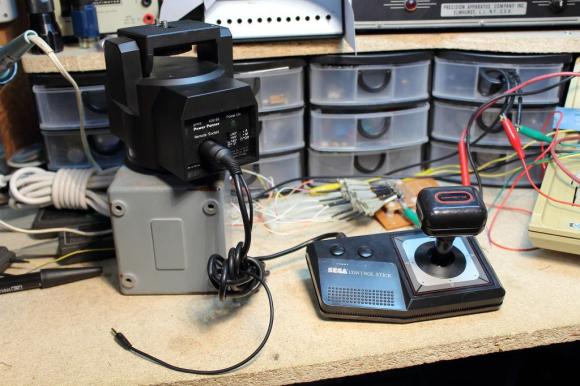
A jarring pan with your tripod can ruin a shot in your film, and tilting up or down usually requires some loosening and tightening kung fu to keep gravity from taking over. The “Power Panner” is a remote-controlled device that fits between the tripod and the camera, handling pans and tilts with ease. When [NeXT] found one at the Capitol Flea Market for $5, he didn’t care about the missing remote. He bought the Panner, dragged it home, and hacked together his own remote with a Sega Master Pad.

After researching similar devices online, [NeXT] had determined the original remote’s pinout: essentially a D-pad with adjustable speed control. He decided to ignore the speed pins and to instead search for a suitable replacement controller. A Sega Master Pad offered the most straightforward solution, so [NeXT] went to work separating out the wires and soldering them to a DIN connector. He couldn’t find the right plug to fit the Panner’s DIN-7 jack, so he substituted a DIN-8 with the extra pin snapped off.

Rather than use the remaining two buttons for speed control, [NeXT] chose to feed them directly into his camera to drive the focus and shutter, but the Master Pad’s wiring posed a problem: the camera would have to share the Power Panner’s ground, and the Panner plugs into the wall via a 6V adapter. Fingers crossed, he decided to push ahead and was relieved that everything worked. We suspect the shared ground won’t be a problem as long as one device uses a floating power supply, which the Panner can provide either through the proper wall wart or by using its 4 AA battery option.

If you’re in the mood for more camera hacks, check out the sound-dampening and waterproofing build from last week.


Filed under: digital cameras hacks

A DIY Solution for Controlling Robots and Quadcopters

$
0
0

RC

RC transmitters used for controlling robots, quadcopters, airplanes, and cars really aren’t that complex. There are a few switches, pots, a screen and a radio transmitter. The maker toolbox already has all these components, so it only makes sense someone would try to build their own RC transmitter.

[Oscar]‘s project started by gathering a bunch of toggle switches, 2-axis joysticks, pots, tact switches, an Arduino, LCD, and a Ciseco XRF wireless module. These were attached to a front panel made of polystyrene and work on the communications protocol began.

It should be noted that microcontroller-powered RC transmitters with XBees is nothing new. There was a Kickstarter for one last year, but the final product turned out to be bit janky and full of fail wiring, We’re really glad to see [Oscar]‘s attempt at a DIY RC transmitter, and hopefully we’ll see this project taken up and improved by others.


Filed under: robots hacks, wireless hacks

Hacking a Streetlight with Lasers

$
0
0

streetlampLaserOff2

$20, some spare parts and a bit of mischief was a small price for [Chris] to pay for a reprieve from light pollution with this remote control laser hack. The streetlight in front of his house has a sensor that faces westward, and flips the lamp on once the sun has disappeared over the horizon. As it turns out, [Chris's] third floor window is due west of this particular lamp, meaning he takes the brunt of its illumination but also conveniently places him in a prime location for tricking the sensor.

According to [Chris], the lamp’s sensor requires two minutes of input before it will switch off and stay off for around 30 seconds before cycling on again. The lamp does not zap straight to full brightness, though; it takes at least a minute to ramp up. [Chris] recalled a hack from a few years ago that essentially used LED throwies tacked onto the sensors with putty to shut off lamps for a guerrilla drive-in movie, but the sensors on those lamps were at the base and easily accessed. [Chris] needed to reach a sensor across the block and nearly three stories tall, so he dug around his hackerspace, found a 5V 20mA laser diode, and got to work building a solution.

[Chris] 3D printed a holder for the laser and affixed it via a mounting bracket to the wall near his third floor window, pointing it directly at the street lamp’s sensor. He plugged the laser’s power supply into an inexpensive remote control outlet, which allowed him to darken the street lamp at a touch of a button. This is certainly a clever and impressive hack, but—as always—use at your own risk. Check out a quick demo video after the break.


Filed under: home hacks, laser hacks

Remote Control FPV cockpit

$
0
0

cockpit

FPV flying, for how awesome it actually is, still consists of fiddling around with a remote control transmitter and either wearing video goggles or squinting into a screen. Awesome, yes, but not as cool as [Brett Hays]‘s enclosed cockpit ground station. It’s a trailerable flight sim that allows you to have the same experience of flying an aircraft over your local terrain without actually leaving the ground.

The centerpiece for this build is a 42 inch flat screen TV that was picked up for $160. This was placed at the front of a large plywood and 2×2 box along with a computer joystick, throttle, and rudder controls.

The pots inside the controls needed to be switched out to match the resistance of the ones inside an old Futaba transmitter. From there, completing the the cockpit was just a matter of fabricating a few panels for a video switcher, gear retract lever, flaps. and RC radio settings.

It’s a truly amazing build and when placed on a trailer towed by [Brett]‘s jeep, has the potential to be the closest thing to flying a manned aircraft you can get without a pilot’s license.

Videos of the cockpit in action below.


Filed under: misc hacks, toy hacks

Primer Tutorials for Arduino IR Remote Cloning and Keyboard Simulation

$
0
0

ir arduino

We’ve featured loads of IR Arduino projects and they are all exciting and unique. The projects spring from a specific need or problem where a custom infrared remote control is the solution. [Rick’s] double feature we’re sharing in this article is no exception, but what is interesting and different about [Rick’s] projects is his careful and deliberate tutorial delivery on how to copy infrared remote codes, store the codes with a flavor of Arduino and then either transmit or receive the codes to control devices.

In the case of his space heater an Arduino was used to record and later retransmit the “power on” IR code to the heater before he awakes on a cold morning. This way his room is toasty warm before he has to climb out from under the covers, which has the added benefit of saving the cost of running the heater all night. Brilliant idea if you don’t have a programmable heating system. Maybe he will add a temperature sensor someday so it doesn’t have to run on strictly time.

A more complicated problem was controlling DVD playback software on his computer remotely. [Rick] says he sits at a distance when watching DVDs on his computer but his computer doesn’t have a remote control like a normal TV. Arduino to the rescue again! But this time he pulls out a Teensyduino because of its added feature of being able to emulate a keyboard and of course the computer DVD playback software accepts keyboard commands. Once again he used the “IRremote.h” library to record certain button codes from an old remote control before adding the retrieved codes to a Teensyduino setup and programmed to receive and decode the remote’s IR signals. The Teensyduino then maps the IR codes to known keyboard shortcuts and transmits the simulated keyboard shortcut commands to the computer via its USB cable where the DVD playback software recognizes the key commands.

As always [Rick] shares all his libraries and sketches on his blog so follow the above links to download the files. You will not miss a single step if you follow his excellent videos below. Plus, here are some other ways and other tools for using an IR remote with your Arduino and cloning an infrared remote.


Filed under: Arduino Hacks, computer hacks, home entertainment hacks

A 555-Based, Two-Channel Remote Control Circuit

$
0
0

NE555N

[fahadshihab], a young tinkerer, shared his circuit design for a simple remote control using 555 timers.  Using a 555 calculator, he designed a clock circuit that would run at 11.99 Hz. Two transistors are connected to inputs (presumably button switches). One sends the plain clock signal, and one sends the inverted clock signal. A matching circuit at the other end will separate the channels. All it requires is connecting the two circuits in order to synchronize them. It would be easy enough to interface this with an oscillator, an IR LED, or a laser for long-range control.

The great thing about this circuit is its simplicity. It’s often so easy to throw a microcontroller into the mix, that we forget how effective a setup like this can be. It could also be a great starter circuit for a kid’s workshop, demonstrating basic circuits, timers, and even a NOT gate. Of course, it would be a good refresher for those without a lot of circuit knowledge too. Once you’ve mastered this, perhaps an AM transmitter is next?


Filed under: classic hacks

Tricked-out Arduino-controlled Time-Lapse is More Than Just a Timer

$
0
0

arduinoPhotoRig

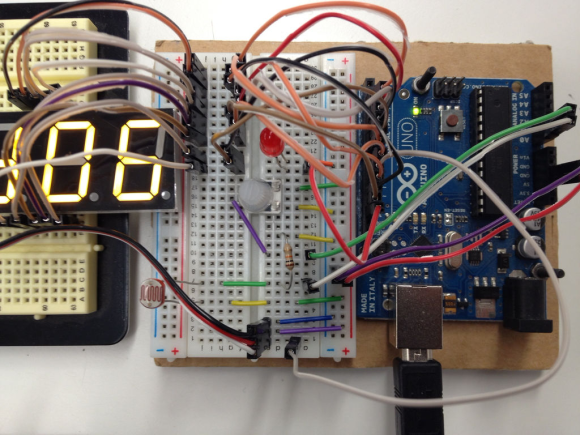
[Hlesliebole] wanted a finer degree of remote control over his time-lapse shots, so he decided to build an Arduino-driven infrared shutter. He ended up creating this killer Arduino-controlled photography rig that does a whole lot more.

This hack was built for [Hlesliebole]‘s Nikon D3100, but he says it should work with any DSLR and remote shutter. This initial build uses an LED as a stand-in for the remote shutter that he ordered.  He intends to update the post once it arrives and he integrates it.

[Hlesliebole] wired a 7-segment display to show the current time delay between photos. This can be set on the fly with a potentiometer, so there’s no need to stop and reprogram the Arduino. And while you’re grabbing a beer and watching the sun slowly sink, the rig can better capture that sunset because of a photoresistor. It detects the ambient light level and minimizes the number of throwaway dark shots.

If that weren’t enough, he’s built servo functionality into the code to support remote control over the camera’s physical position, allowing for panning or rotation over a scene. [Hlesliebole] doesn’t go into detail, but he assures us that there are many tutorials out there.  If you think you’re man enough, you could always work in this outstanding versatile motion dolly hack.


Filed under: Arduino Hacks, digital cameras hacks

Fubarino Contest: Hackaday Tells You You’re A Terrible Pilot

$
0
0

glider

[Mikko] is in to flying F3B racers – remote control airplanes with a three meter wingspan. These races require the pilot to know how much time he has left, and when flying a remote controlled airplane to the edges of visual contact, it’s just not possible to look down and check a stopwatch.

To solve this problem, [Mikko] created a talking F3B timer to announce the flight time and how much time is left in 30 second increments. It’s based on a WTV020 audio module that plays audio from an SD card.  Right now it’s just in the prototype phase, but he does have some code and documentation online.

As for the easter egg, [Mikko] programmed his timer so that if the flight lasts exactly 33 seconds (with millisecond resolution), the Hackaday URL is displayed on the Nokia LCD. We’re betting a flight time of 33 seconds would be highly correlated with a horrible malfunction and the loss of a thousand dollar airframe, so we’re more than happy to cheer [Mikko] up if he eventually sees this easter egg in the field.

Video of the talking timer speaking Finnish below, and a video showing off what these huge sailplanes can do right here.


This is an entry in the Fubarino Contest for a chance at one of the 20 Fubarino SD boards which Microchip has put up as prizes!


Filed under: contests

Sniffing Wired Garage Door Opener Signals

$
0
0

sniffing-garage-door-signals

In addition to being something fun to do with an oscilloscope, this could be a valuable time-saver for anyone looking to tap into the wired communications on a garage door opener. If you own an older model you might be scratching your head. But newer units have more than just one button operation, usually extending to at least two extra buttons that control the lights on the motor unit and lock out wireless control. A quick probing turned up the communication scheme used by the button unit mounted next to the door into the house.

We’ve patched into our own garage door using a simple relay to interface with a microcontroller which will still work for opening and closing the door But if you’re looking for extended control you need to spoof one of the timing signals detailed in this post. We like the stated examples for future hacks: building a better wired button unit, or adding some type of RFID integration. We could see this approach for hacking in motion light control for door openers that don’t have it.

[Thanks Victor]


Filed under: home hacks

3D Printed Netduino Remote Controlled Car

$
0
0

netduinocar

[Matt] lives in South Africa, where homes have smallish crawlspaces (some only 30cm high!) that he can’t quite squeeze himself into. Even if he could, he probably wouldn’t: they’re apparently vacation homes for the local rats. He did, however, want to explore these spaces to get a better idea what’s going on inside, so he built a Windows Phone-controlled car with a Netduino and 3D-printed parts.

Such a specialized application requires unique parts, so [Matt] designed and 3D-printed the wheels and frame from scratch. You’ve probably noticed that the wheels aren’t your typical cylinders. The terrain [Matt] faces is sand, so the spiked shape provides better grip. The body’s design required extra attention because it holds the motors, the Netduino, the motor driver, and the battery.

A Bluetooth module connects to the Netduino and allows [Matt] to drive the car with his Windows Phone, and an inexpensive 5V LED board provides some light for those dark corners. How does it see once inside the crawlspace? It looks like [Matt's] getting to that part. His plan is to simply mount a second phone running Skype and watch the stream. Stick around after the break to see [Matt] use the car to both confuse and excite his dog.

[via reddit]


Filed under: 3d Printer hacks, Microcontrollers
Viewing all 175 articles
Browse latest View live


<script src="https://jsc.adskeeper.com/r/s/rssing.com.1596347.js" async> </script>